Ghosted network adapter
Networking Error: IP address already assigned to another adapter (1179)
Details
- An error message indicates that the IP already exists in the network, but no other virtual machine in the network is sharing the IP.
- On a Windows virtual machine, you see this error:
The IP address XXX.XXX.XXX.XXX you have entered for this network adapter is already assigned to another adapter - After rebooting the virtual machine, the guest operating system NIC is assigned a private IP address.
- After a physical to virtual (P2V) conversion of a machine, you cannot assign an IP address to a NIC.
- After removing and re-adding a virtual NIC, the previous device is no longer visible in Device Manager.
- The NIC is re-enumerated in the guest operating system.
- After a P2V conversion, installed devices such as a Universal Serial Bus (USB) device or ghosted device, are not connected to the computer.
- The Show Hidden Devices option in Device Manager does not display the devices.
Note: To view the hidden devices, navigate to My Computer > Properties > Hardware > Device Manager > View > Show Hidden Devices.
Solution
Cause
Under certain conditions, you may see this error message from a Windows guest operating system:
The IP address XXX.XXX.XXX.XXX you have entered for this network adapter is already assigned to another adapter Name of adapter. Name of adapter is hidden from the network and Dial-up Connections folder because it is not physically in the computer or is a legacy adapter that is not working. If the same address is assigned to both adapters and they become active, only one of them will use this address. This may result in incorrect system configuration. Do you want to enter a different IP address for this adapter in the list of IP addresses in the advanced dialog box?
In this message, XXX.XXX.XXX.XXX is the IP address you are trying to set and Name of adapter is the name of a network adapter that is present in the registry but hidden in Device Manager.
This error can occur when you change a network connection's TCP/IP configuration from DHCP to a static IP address if:
This error can occur when you change a network connection's TCP/IP configuration from DHCP to a static IP address if:
- You have upgraded VMware virtual network adapters (for example, when you migrate a virtual machine from an older to a new version of VMware software). This can also include updating the virtual machine hardware version and/or upgrading the version of VMware Tools.
- You have added and removed network adapters multiple times.
This issue occurs if a network adapter with the same IP address is in the Windows registry but is hidden in the Device Manager (My Computer> Properties > Hardware > Device Manager). This hidden adapter is called a ghosted network adapter.
- You may see this if you recently performed a P2V and the resulting virtual machine still has the physical NICs and drivers for those NICs present. These ghost NICs have the old IP address and the virtual NIC cannot be assigned the same IP address.
Using the Show hidden devices option in the Device Manager (View > Show hidden devices) does not always show the old virtual NIC (ghosted adapter) to which that IP Address is assigned.
For more information, see the Microsoft Knowledge Base article 269155.
Note: The preceding link was correct as of August 20, 2013. If you find the link is broken, provide feedback and a VMware employee will update the link.
Resolution
To resolve this issue, make the ghosted network adapter visible in the Device Manager and uninstall the ghosted network adapter from the registry:
- Click Start > Run.
- Type cmd and press Enter.
- At the command prompt, run this command:
Note: In Windows 2008 and Windows 7, open the command prompt using the Run as Administrator option.
set devmgr_show_nonpresent_devices=1
Note: If this command does not work (a possibility in Windows Server 2000 and 2003), you may need to add the parameter to Windows and set its value:- Right-click the My Computer desktop icon and choose Properties.
- Click the Advanced tab and select Environment Variables.
- In the System variables section, click New.
- Set the Variable name to devmgr_show_nonpresent_devices and set the Variable value to 1 to enable the parameter.
- Click OK to add the variable to Windows.
- Start the Device Manager by running this command from the same command prompt:
start devmgmt.msc - Click View > Show Hidden Devices.
- Expand the Network Adapters tree (click the plus sign next to the Network adapters entry).
- Right-click the dimmed network adapter, then click Uninstall.
- Once all of the grayed out NICs are uninstalled, assign the IP address to the virtual NIC.
Note: To assign the IP address to the virtual NIC on the command line, run the command:
netsh interface ip set address "Local Area Connection #" static IP_Address Subnet_Mask Default_Gateway
For example:
netsh interface ip set address "Local Area Connection 2" static 192.168.1.101 255.255.255.0 192.168.1.1 - Close the Device Manager.
Note: In some Windows versions, a reboot may be necessary to apply the changes.
For more information, see the Microsoft Knowledge Base article 241257.
Allow ICMP IN Windows Firewall
netsh firewall set icmpsetting 8 enable
TLS Enable/Disable in IE settings
The related registry is the following one:
[HKLM|HKCU]\Software\Microsoft\Windows\CurrentVersion\Internet Settings
Find or create the DWORD value SecureProtocols, then modify it with the proper value:
Possible Vaules: Combinations of Secure Protocols:
0 => Do not use secure protocols
8 => Only Use SSL 2.0
32 => Only Use SSL 3.0
40 => SSL 2.0 and Use SSL 3.0
128 => Only Use TLS 1.0
136 => Use SSL 2.0 and TLS 1.0
160 => Use SSL 3.0 and TLS 1.0
168 => Use SSL 2.0, SSL 3.0 and TLS 1.0
512 => Only use TLS 1.1
520 => Use SSL 2.0 and TLS 1.1
544 => Use SSL 3.0 and TLS 1.1
552 => Use SSL 2.0, SSL 3.0 and TLS 1.1
640 => TLS 1.0 and TLS 1.1
648 => Use SSL 2.0, TLS 1.0 and TLS 1.1
672 => Use SSL 3.0, TLS 1.0 and TLS 1.1
680 => Use SSL 2.0, SSL 3.0, TLS 1.0 and TLS 1.1
2048 => Only use TLS 1.2
2056 => Use SSL 2.0 and TLS 1.2
2080 => Use SSL 3.0 and TLS 1.2
2088 => Use SSL 2.0, SSL 3.0 and TLS 1.2
2176 => TLS 1.0 and TLS 1.2
2184 => Use SSL 2.0, TLS 1.0 and TLS 1.2
2208 => Use SSL 3.0, TLS 1.0 and TLS 1.2
2216 => Use SSL 2.0, SSL 3.0, TLS 1.0 and TLS 1.2
2560 => TLS 1.1 and TLS 1.2
2568 => Use SSL 2.0, TLS 1.1 and TLS 1.2
2592 => Use SSL 3.0, TLS 1.1 and TLS 1.2
2600 => Use SSL 2.0, SSL 3.0, TLS 1.1 and TLS 1.2
2688 => TLS 1.0, TLS 1.1 and TLS 1.2
2696 => Use SSL 2.0, TLS 1.0, TLS 1.1 and TLS 1.2
2720 => Use SSL 3.0, TLS 1.0, TLS 1.1 and TLS 1.2
2728 => Use SSL 2.0, SSL 3.0, TLS 1.0, TLS 1.1 and TLS 1.2
Here is a TechNet blog talking about this (Language is in German):
Cortana app cannot type and search windows 10
Re-register the Cortana app
After the November Update, if you used this method to fix this problem using the Appx PowerShell cmdlet, it broke the Windows Store apps – maybe due to some bug. But it works now, and I have
Open an elevated Powershell prompt, type the following command and hit Enter:
Get-AppXPackage -AllUsers | Foreach {Add-AppxPackage -DisableDevelopmentMode -Register "$($_.InstallLocation)\AppXManifest.xml"}
windows-server-2012-naming-information-located-because-domain-exist-contacted
The solution seems to be very simple
Go to Registry editor and open the key SysvolReady at HKEY_LOCAL_MACHINE\SYSTEM\CurrentControlSet\Services\Netlogon\Parameters
If the value of the key is 0 change it to 1. If the value is 1 change it to 0 and ‘Accept’, again change to 1 and accept. Exit registry editor.
Great !!! Worked like a charm.
Outlook could not create the work file" error when you start Outlook

Cause
This problem occurs when the Cache string value in the registry doesn't point to a valid directory.
Resolution
Warning Serious problems might occur if you modify the registry incorrectly by using Registry Editor or by using another method. These problems might require you to reinstall the operating system. Microsoft cannot guarantee that these problems can be solved. Modify the registry at your own risk.
To resolve this issue follow these steps.
- Exit Outlook.
- Start Registry Editor. To do this, use one of the following procedures, as appropriate for your situation:
- Windows 10, Windows 8.1 and Windows 8: Press Windows Key+R to open a Run dialog box. Type regedit.exe and then press OK.
- Windows 7 or Windows Vista: Click Start, type regedit.exe in the search box, and then press Enter.
- Locate and then click the following subkey:HKEY_CURRENT_USER\Software\Microsoft\Windows\CurrentVersion\Explorer\User Shell Folders
- Right-click the Cache key, and then click Modify.
Note The Cache string value varies, depending on your version of Windows.
Windows 10, or Windows 8.1DWORD: Cache
Type: REG_EXPAND_SZ
Data: %USERPROFILE%\AppData\Local\Microsoft\Windows\INetCache
Windows 8, Windows 7, or Windows VistaDWORD: Cache
Type: REG_EXPAND_SZ
Data: %USERPROFILE%\AppData\Local\Microsoft\Windows\Temporary Internet Files
Windows XPDWORD: Cache
Type: REG_EXPAND_SZ
Data: %USERPROFILE%\Local Settings\Temporary Internet Files - On the File menu, click Exit to exit Registry Editor.
File Explorer crashes after Right Click in Desktop
In Windows 7 IO have deleted entry from
[HKEY_CLASSES_ROOT\*\shellex\ContextMenuHandlers\BriefcaseMenu]\
[HKEY_CLASSES_ROOT\*\shellex\ContextMenuHandlers\BriefcaseMenu]\
Reading a memory.dmp or other .dmp file
How to configuring IE Site Zone mapping using group policy without locking out the user
Posted by Alan Burchill on 17 July 2012, 11:48 am
ref: https://www.grouppolicy.biz/2012/07/how-to-configuring-ie-site-zone-mapping-using-group-policy-without-locking-out-the-user/
 If you saw my tweet or Darren Mar-Elia blog post you may be glad to know that the legacy Internet Explorer Maintenance section of group policy has now been removed in Windows 8. Unfortunately this means that you can now longer natively configured the IE Site to Zone mapping using native group policy setting without still allowing the user to customise the URL list. So below I will show you how you can still use Group Policy to configure the IE Zone via group policy while still allowing the user the ability to add additional sites.
Put simply we are going to setup the IE Zone registry keys manually using Group Policy Preferences…
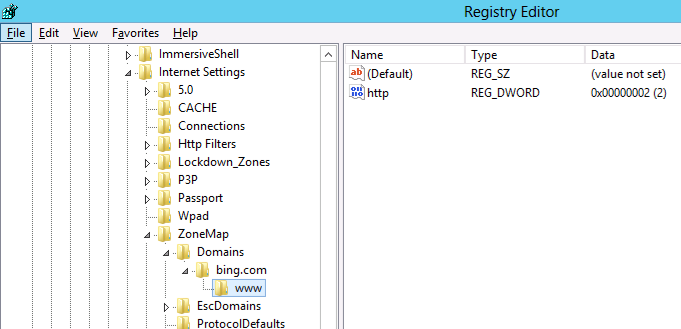
However it’s a little complicated as the URL that is in the Site to Zone mapping is actually stored as the name of the key. Finally the protocol is the registry value with a number that assigns it to the corresponding zone. In the example we use we will first look at the currently site that the users has setup in the trusted site list (www.bing.com). As you can see below the zone is store at HKCU\Software\Microsoft\Windows\CurrentVersion\Internet Settings\ZoneMap\Domains then the domain is stored as a key “Bing.com” then “www”. Within the “www” key the protocol (http and/or https) is the value name with the value representing what zone it should be a member.
Note: We are just using bing.com as an example as you would never add at search engine as a trusted site.

Now we will add the additional site www.google.com.au also to the trusted sites list using group policy.
Step 1. Edit a Group Policy that is targeted to the users that you want the IE Zones applied.
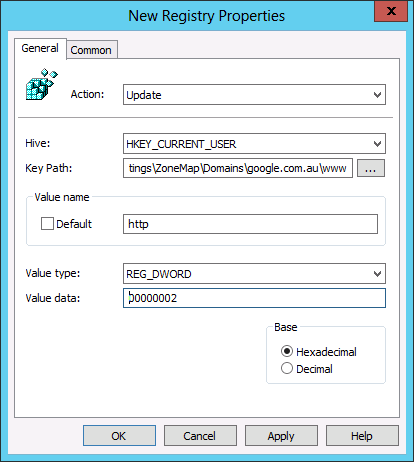
Step 2. Create a new Group Policy Preferences Registry Extension then select the “HKEY_CURRENT_USERS” Hive and then type “Software\Microsoft\Windows\CurrentVersion\Internet Settings\ZoneMap\Domains\google.com.au\www” in the Key path. Then enter the Value name of “HTTP” and selected the Value Type as “REG_DWORD” and set the value data as “00000002”.

And you’re Done…
TIP: For your reference the values and their corresponding Zones are listed below in the table.
| Value | Zone Name |
| 00000000 | My Computer |
| 00000001 | Local Intranet |
| 00000002 | Trusted Site |
| 00000003 | Internet |
| 00000004 | Restricted |
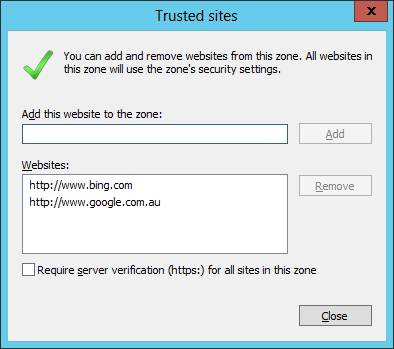
As you can see below the IE zone will push out to your users and it will be added to the trusted zone list, while still allowing them to add and remove other zones from the list.

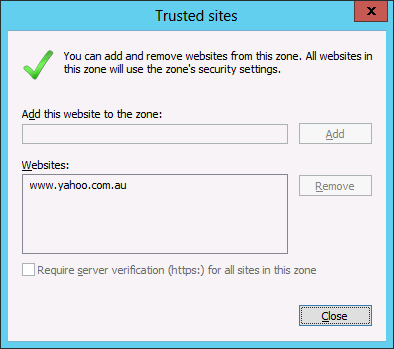
TIP: As always the native group policy settings will take precedence over Group Policy Preferences therefore if you have the “Site to Zone Assignment List” setting configured as well this will override (not merge) the above settings (See image below).

- Get link
- X
- Other Apps
- Get link
- X
- Other Apps